Tuesday, November 10, 2015

Fall in Love Fashion

So happy it's finally beginning to feel like Fall. So you know as soon as it was cold enough I had to put on my fuzzy socks! These are my absolute favorite socks. They have a feather like fabric on the inside and they're so incredibly soft! Thank you to my good friend Heather for getting these for me for Christmas, I love them! P.S. isn't my panda blanket adorable!?


I especially love this small flower detail on the side it makes them so much cuter than just being a plain sock. 


You can even fold them over and make them look like fuzzy booties!
Like I said the inside is soooo soft, it's like being in a cloud!


Or you can just scrunch them down slightly.


No matter what you're in for a world of comfort!

Thursday, November 5, 2015

Everyday Makeup Routine for the Lazy Girl

Having to wake up early in the morning to go to work is rough. At least for most of us. I'd much rather sleep in with my comphy blankets and pillows. But what makes the mornings easier for me, so I can sleep in as long as possible, is having an easy makeup routine in the morning. 

1. If you're feeling extra tired on a particular morning one thing you can do to help wake yourself up is to splash your face with some cold water. And since your face is now already wet you can use your favorite cleanser to get your face nice and clean before putting on any products. 

2. After washing my face I always apply a moisturizer. Weather you have normal-to-dry or combination-to-oily skin you should always be using a moisturizer that's specific to your skin type. I personally use Mary Kay Moisturizer in combination-to-oily. 


3. Next I want to prep my skin by using a face primer. This will allow your makeup to go on smoothly and last all day without running off your face. I personally use Maybelline Master Prime.

Now that we've prepped our skin we can start applying our products. 

4. The first thing I want to do is correct my skin tone. I personally don't like to use heavy weight products like foundation so instead I use a color corrector such as Laura Mercier tinted moisturizer with SPF 20. (You can use whatever your go to foudation or color corrector would be)


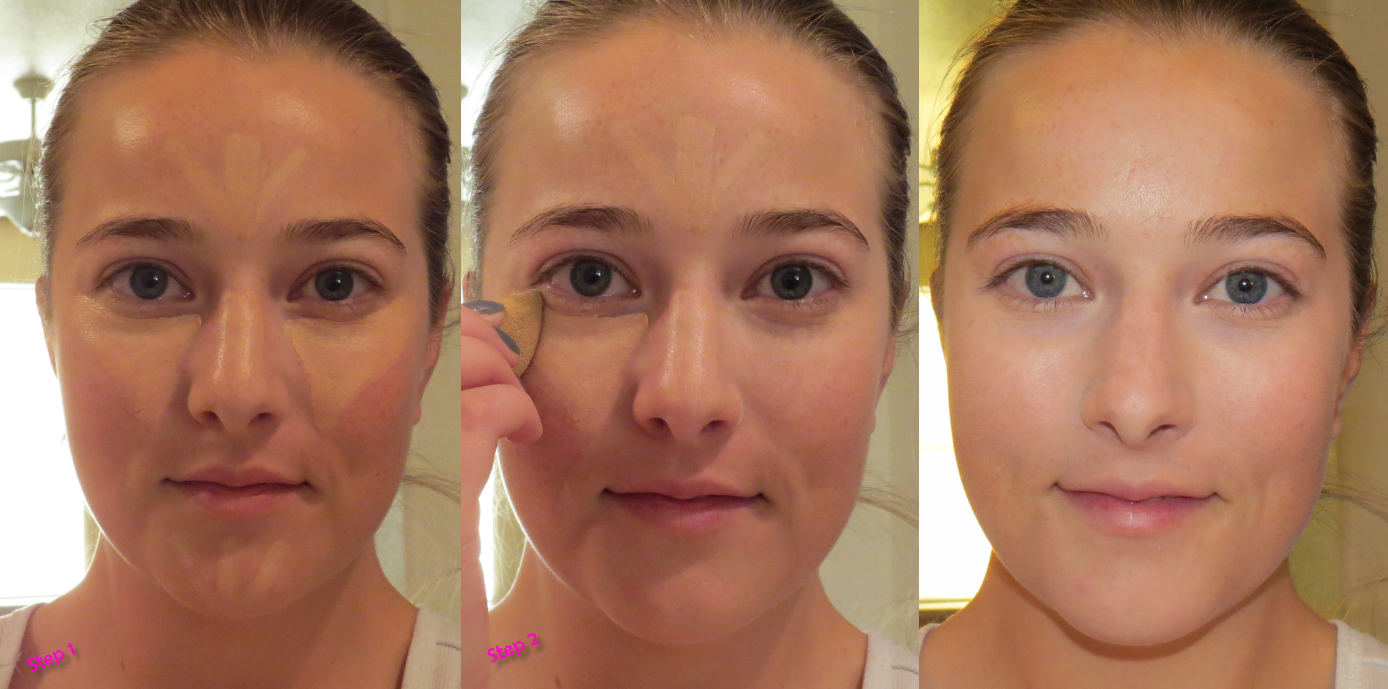
5. Next to brighten up my skin even more I love using the Maybelline Dreamlumi Highlighting Concealer. Where to apply: Under eyes, down the bridge of nose, chin, and forehead
Then I blend using the Beauty Blender Mini.


TIP: When using any type of beauty blender, dampen it under water. Once it's fully expanded, squeeze out all the excess water and slightly pat dry on a towel. This will make your look flawless.

6. For additional blemishes or covering those annoying undereye circles you can apply another concealor such as the Kat Von D lock-it tattoo concealor. Apply under eyes (same as above) and on any skin imperfections. Blend again with your beauty blender.

7. Now we want to set everything in it's place. Use your favorite pressed powder or for additional brightning and a lighter coverage a translucent powder. Apply using a fluffy powder brush all over face and a smaller fluffy brush for under your eyes using a patting motion.
You can find so many great translucent powders, this one is from Mary Kay. MakeUp ForEver also makes a really great translucent powder called HD High Definition.


Tip: Apply powder products over other powdered products this allows for a smoother application and makes blending so much easier. 

8. Apply your favorite bronzer. I've heard so many good things about the Benefit Hoola Bronzer. I finally caved and bought one and I don't know how I've lived without it for so long, it's amazing! Apply in a E3 shape contouring your temples, below the cheek bone, and along your jaw line. 


9. Brighten up your cheeks with a nice blush. This is NYX Blush in Angel. Apply to the apples of your cheeks. This will give you a little more color to your face and give you a more natural look. 


10. To give our skin that dewey glow that we all naturally want to have. Apply a highlight color. This is Benefit High Beam. Apply to top of cheek bone, top of nose, cupid bow, and anywhere else the light naturally thouches your face.


11. Define your brows. Now I'll admit I was never one to define my brows since I naturally have very thick brows. Until I discovered the Benefit Gimmie Brow and OMG it has changed my life! This product, while not adding any additional color (since I don't need it), shapes and makes my brows look so much more defined and polished.


12. Lips! Instead of using a harsh lipstick just add a little bit of color. This has more of a natural look but still gives you a pop of color. I love the Nars Satin Lip Pencil in Rose Pink.

 Lastly add your favorite mascara and you're all done!


All Products
Mary Kay Moisturizer in Combination-to-Oily - $24 from your MK consultant
Maybelline Master Prime - $7.99 Target
Laura Mercier Oil Free Tinted Moisturizer with SPF 20 in Nude - $44 Sephora
Maybelline Dreamlumi highlighting concealor in Radiant - $5.79 Target
Kat Von D Lock-It Tattoo Concealer - $25 Sephora
Mary Kay translucent powder - $16.00 from your MK consultant
Benefit Hoola Bronzer - $28 Sephora
NYX Blush in Angel - $6.49 Target
Benefit High Beam - $26 Sephora
Benefit Gimmie Brow - $24 Sephora
Nars Satin Lip Pencil in Rose Pink - $26 full size Sephora (or free birthday gift)
Mary Kay Lash Love Mascara in Black - $15 from you MK consultant

Tuesday, October 20, 2015

How To: Perfect Brown Smoky Eye


Have you ever wondered how to get that perfect smoky look? Then you try to recreate it and it just ends up looking like one messy color all smudged together. 


Rocking that signature smoky eye isn’t just for a night out on the town. You can strut that beautiful smoky look in the day time too just by changing up the colors.


Here are my easy how-to steps for getting the perfect smoky eye.  


Step 1: Decide what color smoky eye you want. I suggest using a color you already know looks good on you. That way when you decide to amp the color up you can be confident that you’ll look fabulous! I chose to use my Naked 2 Palette by Urban Decay which gives a wide variety of colors to choose from.


Step 2: Eye Primer. Apply all over your lid to the brow bone and on your lower lash line. This will help define your eye shadow color, make blending easier, and keep it in place all day. I personally use the “Urban Decay Eyeshadow Primer Potion”.

Tip: Use your ring finger to apply. Why? It’s your weakest finger so it won’t harm the skin around the eyes


Step 3: Building color: It’s important to remember to start with the lightest shade first. Continuing to build and add darker shades as you go. If you start with the darkest shade first your eye shadow could look muddy.


Step 4: Bootycall apply this first shade all over your lid and crease and inside ½ of lower lash line. (Any nude or light color will work)


Step 5: Tease apply to the outer 1/3 of your lid and blend into the crease.


Step 6: Snakebite apply to the outer 1/3 of your lid concentrating on the outside corner and blending into crease. Take the small end of the brush and also apply on the outer ½ of your lower lash line.


Step 7: Blackout apply using a small angle brush as close to the upper lash line as possible. Also apply a small amount to your lower lash line. Make sure to blend well and connect the top and bottom line.


Step 8: Foxy apply to brow bone and inner corner of eye

Step 9: Mascara apply to both top and bottom lashes


That’s it!
Add your favorite blush and lip color and you're ready for a day of looking fabulous!


Friday, October 16, 2015

Start of Something New


Today is a big day. I've decided to make one of my dreams a reality by starting my own blog. 

A little about me:
I haven't always been a girly girl who wanted to wear dresses and put on makeup. I've always lived life my way and never fit into one stereo type. When I was younger I was very much a tom-boy and was always outside. I played baseball with the boys and soccer for many years. After my years of playing baseball I continued the game by becoming an umpire. Not the typical thing a girl would do but I wanted to be just like my brothers and so I followed their path. I rode dirt bikes with my friends and wasn't afraid of getting dirty. 

I always had a very outgoing personality and sometime during high school I started getting more involved in beauty and fashion and developing my own sense of style. Now I'll admit that I did have a Gothic phase in high school; but who doesn't? Once I got out of my "rocker" phase I bought a purse. OK, lets be honest it was a tote bag, but it was a purse to me. That's when it all started! I started wearing dresses and paid more attention to my fashion. I started wearing more makeup and had fun figuring out how to make it look good. Thank goodness for YouTube videos teaching me how to put on makeup.

Now here we are at the start of something new, a new adventure in life. A blog? What? I can tell you I am more confident now then I ever have been. I really want to share with you some of the tips and tricks I've learned but mainly write about the things that I have a true passion for. I truly hope you'll follow along with me and support me in this new adventure. Maybe you'll learn some new tricks too!

With love,
Lisa


"When life throws you a curve, just lean into it."


*Special thanks to Angelique Cooper for giving me the courage and inspiration to start my blog*
check out her blog angeliquecooperblog.com